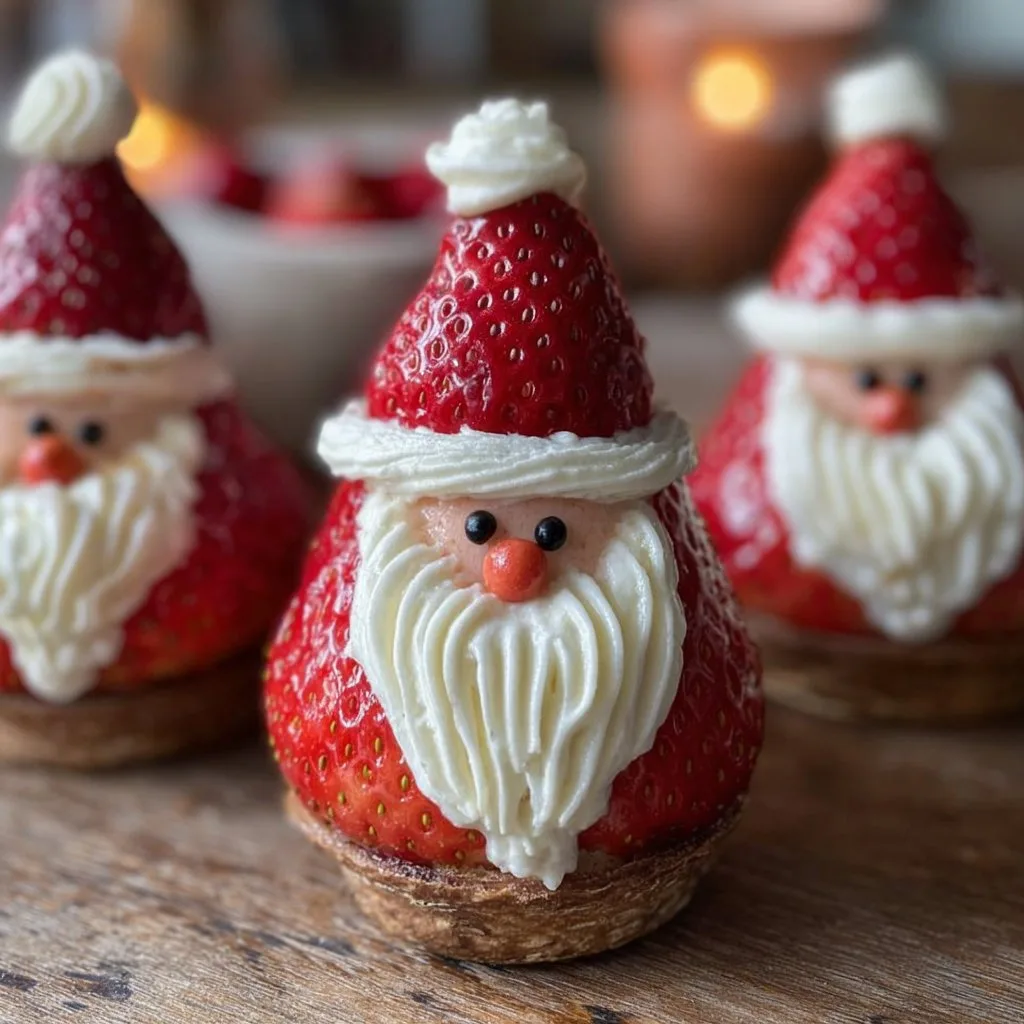
Sweetest Strawberry Santas: Christmas Magic in Every Bite!
Sweetest Strawberry Santas bring a delightful twist to your holiday celebrations. These adorable treats combine the freshness of strawberries with a creamy filling, creating a fun and festive dessert. Not only are they visually appealing, but they also offer a sweet and tangy flavor that is sure to enchant both kids and adults alike. Let’s dive into why you will love these Strawberry Santas and how you can make them at home.
Thank you for reading this post, don't forget to subscribe!Why You’ll Love This Strawberry Santas
Strawberry Santas are the perfect Christmas treat for several reasons. First, they are incredibly simple to make, requiring minimal ingredients and effort. Second, they are visually stunning and are sure to impress your holiday guests. Third, they are a healthier alternative to traditional holiday sweets, giving you a guilt-free way to indulge. Finally, the combination of the creamy filling and juicy strawberries makes for a delightful flavor explosion in every bite.
How to Make Strawberry Santas
Ingredients:
- 12 large strawberries
- 1 cup whipped cream cheese, very cold
- 2 tablespoons powdered sugar, sifted
- ¼ teaspoon pure vanilla extract
- Decorative red icing (for cheeks, optional)
- Decorative black icing (for eyes) OR mini chocolate chips
Step-by-Step Instructions:
- Prepare Strawberries – Wash and Dry: Start by gently washing all your strawberries under cool running water. It’s crucial to dry them completely to prevent the cream from sliding off. Lay them out on a clean kitchen towel or paper towels and gently pat them dry, ensuring no visible water remains on the surface.
- Prepare Strawberries – Hull: Hull each strawberry by carefully removing the green leafy cap and the tough white core with a small, sharp paring knife. Remove enough so the base is relatively flat, allowing the Santa to stand upright, but preserve as much red flesh as possible.
- Prepare Strawberries – Trim for Stability: Examine the base of each hulled strawberry. If any are wobbly, carefully trim a very thin, flat slice from the bottom to ensure they stand proudly on your serving platter without toppling over.
- Prepare Strawberries – Cut the Hat Section: For each strawberry, cut off the top third horizontally across the wider end to create the ‘hat.’ The larger bottom piece will be Santa’s body. Set the ‘hats’ aside carefully, ideally keeping the hat and body from the same strawberry together for a seamless fit.
- Prepare Cream Cheese Mixture – Chill Equipment: For the best result, chill your large mixing bowl (preferably metal or glass) and your whisk attachment (or beater blades) in the freezer for at least 15-20 minutes before you start. This helps the cream cheese mixture hold its shape better.
- Prepare Cream Cheese Mixture – Combine Ingredients: Retrieve your chilled bowl and whisk. Add the very cold whipped cream cheese, sifted powdered sugar, and pure vanilla extract into the bowl. Sifting the sugar prevents lumps and ensures a smooth, silky texture.
- Prepare Cream Cheese Mixture – Whip: Start whipping the mixture on low speed with an electric mixer to prevent splashing and gently combine ingredients. Gradually increase the speed to medium-high and whip until the cream cheese mixture is light, fluffy, and holds its shape well for piping. Avoid over-whipping.
- Prepare Cream Cheese Mixture – Prepare Piping Bag: Fit a piping bag with a star tip (e.g., Wilton 1M). Fold the top edges of the piping bag down to create a wide cuff over your hand or a tall glass for easier filling.
- Prepare Cream Cheese Mixture – Fill Piping Bag: Using a rubber spatula, carefully scoop the whipped cream cheese mixture into the piping bag, filling it about two-thirds full. Twist the top securely to seal and push the cream down towards the tip, ensuring no large air bubbles.
- Assemble Santa – Position Strawberry Body: Take one of your larger strawberry pieces (the ‘body’) and place it flat-side down on your serving platter or a cutting board lined with parchment paper. Ensure it’s stable.
- Assemble Santa – Pipe Body and Beard: Hold the piping bag perpendicular to the strawberry body. Pipe a generous swirl of cream cheese mixture onto the flat cut surface, covering it entirely to create Santa’s body. Extend a portion of this cream forward and downward to create the fluffy beard. For a fuller beard, pipe a second, smaller swirl on top of the first around the front edge.
- Assemble Santa – Place Hat: Gently take one of the strawberry ‘hat’ pieces and carefully place it on top of the piped cream cheese mixture, aiming for the center. Press down very lightly to secure it, ensuring the pointy end faces upwards.
- Assemble Santa – Add Pom-Pom: Pipe a small, neat dollop of cream cheese mixture right onto the very tip of the strawberry hat. A quick squeeze and release will create a lovely little star-shaped peak, resembling a fluffy pom-pom.
- Assemble Santa – Create Eyes: Take two mini chocolate chips or use decorative black icing. Carefully place them or pipe dots onto the cream cheese mixture beard, just below the strawberry hat, where Santa’s eyes would naturally be. Ensure they are evenly spaced for a cheerful expression.
- Assemble Santa – Add Optional Buttons: For extra detail, you can place a couple more mini chocolate chips or pipe small dots of decorative icing down the front of the cream cheese mixture ‘body’ as Santa’s buttons.
- Assemble Santa – Add Optional Blush: For rosy cheeks, gently tap a tiny bit of red sanding sugar or use decorative red icing just below the eyes on the cream cheese mixture. Be very gentle and use a light hand.
- Assemble Santa – Add Optional Mint Leaf: For a final gourmet touch, place a tiny fresh mint leaf near the base of each Santa, perhaps tucked slightly under the cream cheese mixture, adding a beautiful pop of green.
- Assemble Santa – Repeat and Arrange: Continue this process for all your remaining strawberries and cream cheese mixture. Arrange the completed Strawberry Santas on your serving platter, spacing them out so each can be admired.
- Chill Before Serving: Transfer the serving platter to the refrigerator and allow the Strawberry Santas to chill for at least 30 minutes, or up to 2 hours. This chilling time helps the cream cheese mixture firm up, ensuring they maintain their shape beautifully and are wonderfully cool and refreshing.
- Final Inspection and Serving: Before serving, quickly check your Santas for any needed gentle adjustments. Serve them chilled directly from the refrigerator for the best texture and flavor. They are perfect on their own or alongside other holiday treats.
- Storage: Store any leftovers in an airtight container in the refrigerator for 1-2 days. Fresh is always best, as strawberries can release moisture over time. Place parchment paper between layers if stacking.

How to Serve Strawberry Santas
These charming Strawberry Santas can be served as part of a festive dessert platter, making them a delightful centerpiece for your holiday gatherings. They also make fantastic individual treats for kids and adults alike. You can pair these treats with other Christmas goodies like cookies and holiday cakes, creating a wide variety of flavors for your guests to enjoy.
How to Store Strawberry Santas
Storing Strawberry Santas properly helps retain their freshness. Keep any leftovers in an airtight container in the refrigerator. It’s best to consume them within 1-2 days for optimal flavor and texture, as strawberries may release moisture and become soggy over time. If you need to stack them, use parchment paper between layers to prevent sticking.
Tips to Make Strawberry Santas Perfect
- Choose Fresh Strawberries: Look for large, ripe strawberries with a bright red color and a firm texture. Fresh strawberries will make your Santas not only look great but taste better too.
- Chill Your Ingredients: Keep your cream cheese very cold before whipping. Chilling your mixing equipment will also help the mixture hold its shape longer.
- Practice Piping: If you’re new to piping, practice on parchment paper before decorating your Santas. This will help you become familiar with the pressure needed for piping.
Flavor Variations
Feel free to adjust the flavors to suit your taste. You can use flavored cream cheese, such as strawberry or raspberry, for a fruity twist. Additionally, consider mixing in chocolate chips or sprinkles into the cream cheese mixture for added texture and flavor.
Pro Tips for Success
- Make Ahead: Strawberry Santas can be prepared a few hours in advance, allowing you more time to enjoy your holiday festivities.
- Presentation Matters: Arrange your Santas on a festive platter. You can even add some greenery or other edible decorations for a more visually appealing setup.
- Experiment With Toppings: Try using crushed nuts or festive sprinkles to add extra flavor and holiday spirit to your Santas.
FAQs About Strawberry Santas
1. Can I use other types of fruit?
Yes! While strawberries are perfect for this recipe, consider using large blueberries, bananas, or even apples for a different twist. Just ensure they are stable enough to stand.
2. How do I prevent the strawberries from leaking juice?
Make sure to pat the strawberries dry thoroughly after washing. You can also chill the completed Santas before serving to help solidify the cream cheese mixture and reduce any leaking.
3. Can I make these ahead of time?
Absolutely! These treats can be made a few hours before your event. Just store them in the refrigerator until you’re ready to serve, ideally no more than one day in advance to ensure freshness.
Final Thoughts
Sweetest Strawberry Santas are not only a fun and festive holiday treat but also a healthier option for your gatherings. With their simple preparation and delicious flavor, they are bound to bring Christmas magic to every bite. Whether you’re looking to impress your guests or treat your family, these delightful creations are sure to spread joy and cheer this holiday season. Enjoy making and sharing this delightful treat with your loved ones!

Sweetest Strawberry Santas
Ingredients
Method
- Wash and dry the strawberries thoroughly to prevent the cream from sliding off.
- Hull each strawberry by removing the green leafy cap and the tough white core for stability.
- Trim the base of any wobbly strawberries to ensure they stand upright.
- Cut off the top third of each strawberry to create Santa's hat, keeping the larger bottom piece for the body.
- Chill your mixing bowl and whisk attachment in the freezer for at least 15-20 minutes.
- Combine the chilled whipped cream cheese, sifted powdered sugar, and vanilla extract in the bowl.
- Whip the mixture on low speed, then increase to medium-high until light and fluffy.
- Prepare a piping bag with a star tip and fill it with the whipped cream cheese mixture.
- Place the large strawberry body flat-side down on a serving platter.
- Pipe a swirl of the cream cheese mixture onto the body to create Santa's body and beard.
- Attach the strawberry hat to the piped cream cheese mixture.
- Pipe a small dollop on top of the hat for the pom-pom.
- Add mini chocolate chips or black icing for eyes.
- Optionally, place mini chocolate chips as buttons and use red icing for rosy cheeks.
- Add a mint leaf for a touch of color.
- Repeat assembly for all strawberries and arrange them on a platter.
- Chill the assembled Santas for at least 30 minutes before serving.
- Serve chilled and enjoy your festive treat!
